All Posts By

Tech3

Why to Update your Web Browser

By blog

Why to Update your Web Browser

is the tool you use to view websites on the internet. There are a number of browsers available, with the most popular being Google Chrome, Firefox and Internet Explorer. But It’s strongly advisable to use the most versions to get the best and most secure browsing experience.

Why- to Update your Web Browser

From the chart above, you can clearly see that Google Chrome is the leading browser, with nearly 50% of users. Firefox and Internet Explorer have more or less the same share with around 17% and 20% respectively. Apple’s browser Safari, is growing in popularity with the increase of iPhone and iPad users, as this browser is installed on their device.

Security vulnerabilities

If you are using an outdated browser then you are putting yourself at risk from a number of security threats. Internet Explorer 6, 7 and 8 are less stable and more vulnerable to viruses, spyware, malware and other security issues.

Performance issues

Older browsers tend to have lots Performance issues. First of all, you may find that images usually have a slower loading speed. This can be frustrating and creates a poor user experience. Also even worse, older browsers have a higher tendency to crash, which is exactly what you don’t need after nearly completing a long online form!

Compatibility and display problems

If you are using an outdated browser version your web site will have lots of display problems. Websites should display consistently across all browses. Optimization of a website across browsers – so that it looks the same and works in the desired way – can sometimes be difficult, particularly when it comes to the multiple versions of Internet Explorer (IE).

Support of newer web technologies

Older browser version does not support many of the latest technologies. Web technology moves at a very fast pace and new technologies are constantly being adopted by developers. In the last 5 years or so, HTML5 and CSS3 have emerged and become widely adopted across the web. These new technologies have created many exciting new possibilities, however they have been held back by the lack of support on older browsers.

Responsive design issues

Old browsers can be limited for responsive sites, meaning if you happen to be using an outdated browser, you may find responsive websites don’t display correctly.

Like Us on Facebook:  

Follow Us on Linkedin:  

If you are looking for a based company for your website design work, then you must contact us for a better web design deal. Choosing your based company really matters for your company web design work.

Difference between JPEG and PNG

By blog

Difference-between-JPEG-and-PNG

is a standardized image compression mechanism. JPEG files can be relatively small in size, but they still look crisp and beautiful. Jpeg image format supports up to 16.7 million colors, which makes them the right choice for complex images. It works well on photographs, naturalistic artwork, and similar materials. JPEG is “lossy”, meaning that the image you get out of decompression isn’t quite identical to what you originally put in. The algorithm achieves much of its compression by exploiting known limitation of the human eye, notably the fact that small color details aren’t perceived as well as small details of light-and-dark. Thus, JPEG is intended for compressing images that will be looked at by humans.

With the wide range of colors, you can have beautiful imagery without a bulky file size. With new responsive techniques, you can also have flexible images without large loading times. For good-quality, full-color source images, the default quality setting (Q 75) is very often the best choice. Try Q 75 first, if you see defects, then go up with it.

format is superior to GIF in that it has better compression and supports millions of colors. PNG files end in a .png suffix. Designers need the ability to incorporate low-resolution images that load quickly but also look great, too. This is where PNG image format introduced. PNG-8 does not support transparency, but PNG-24 and PNG-32 do. PNG transparency is different from Gif transparency, because they can have different levels of transparency.

PNG files are tight, which means that they do not lose quality during editing. This is unlike jpegs, where they lose quality. PNG files tend to be larger than jpegs, because they contain more information. But PNG files do not support animation.

Like Us on Facebook:  

Follow Us on Linkedin:  

If you are looking for a based company for your website design work, then you must contact us for a better web design deal. Choosing your based company really matters for your company web design work.

Why WordPress?

By blog

Why-WordPress

Often People ask us: Isn’t my old site good enough? Here is the answer for such questions. WordPress is that it’s easy to use and flexible enough for just about anything.

That’s the main reason why WordPress has grown so much in popularity. According survey, WordPress powers 22.5% of all websites on the internet. Because of it’s robust features, many of the top brands use WordPress for their websites such as Time Magazine, Facebook, Sony, Disney, LinkedIn, The New York Times, CNN, eBay, and more.

WordPress is Open Source

Due to the nature of open source, WordPress is a community software. It is maintained by a large group of expert’s majority of whom are WordPress consultants with active interest in growing and maintaining WordPress. By using WordPress you become part of that awesome community.

Easy to Manage 

Today WordPress is used by millions of people and almost every day new people are joining the WordPress community. WordPress iis fairly easy to use this is the reason why people quickly adapt to it. WordPress makes you easy to customize because it has its own options panel allowing you to manage content of your website.

WordPress is SEO Friendly 

WordPress is written in a standard compliance high quality code and produces semantic mark up which makes your site very attractive to search engines. By design WordPress is very SEO friendly, and you can make it even more SEO friendly by using Your own skills.

WordPress is Safe and Secure 

WordPress is developed with security in mind, so WordPress is considered quite safe and secure to run any website. However, just like the real world, the internet can be an uncertain place.

Easy Handling Different Media Types

WordPress is not just limited to writing text. It also comes with built-in support to handle images, audio, and video content. You can also use for document or file management.

WordPress also makes you to Import contents from social media into your website.

Like Us on Facebook:  

Follow Us on Linkedin:  

If you are looking for a based company for your website design work, then you must contact us for a better web design deal. Choosing your based company really matters for your company web design work.

How to change from IMAP to POP3 account

By blog

Converting from an IMAP account to POP3 account will mitigate the server from administering the emails of user. Reason being with POP3 account, mails gets saved on the user’s system locally. The conversion of IMAP account to POP3 accounts is mentioned clearly in the following steps.

Step 1. Add a POP3 Account

To add a POP3 Account Please see Our blog in few clicks

After Adding POP3 Account Please follow the steps below

Step 2: Move the Mail Folders

After the user’s account has been added as a POP3 account, all the emails which are present in the Inbox folder of the IMAP account will start downloading. But, the contents from sent items and additional sub-folders created by users won’t get downloaded. It is because POP3 protocol provides for downloading the messages from the inbox folder only.

To Move your data, simply select the messages or folders that you want to have in your POP3 mailbox and initiate a copy or move command or use the drag & drop method. If you drag & drop mails or folders via your right mouse button, you’ll get an option to either move or copy the selected items.

Note -> You cannot move or copy the Inbox or Sent Items folders since these are special folders. To move these items, you’ll have to select the messages instead of the folder.

How to change from IMAP to POP3 account step 2

To keep the original structure of messages intact, users can first clear out the contents of POP3 account. The status of all the messages like read or unread will remain unchanged even after transferring the contents to the new account. This act is done to avoid any duplicate messages in the inbox.

The smoothest way to move the Calendar items at once is by placing Calendar folder in a list view. For example- All Appointments list view or category view. Then move the items by selecting them (via CRTL+A) and then apply drag & drop option.

Step 3. Remove your current IMAP account

After all the messages are copied to POP3 account mailbox, the IMAP account can be removed by accessing the Account Settings option.

In case of Outlook 2013, proper steps should be taken to ensure that the PST file of the POP3 account is placed as default store before aiming to remove the IMAP account. This can be done by selecting “Data” option, then choose POP3 mailbox store that contains the PST file and finally click on the option “Set as Default.”

It should be noted that it is mandatory to restart the system in case of Outlook 2013 while switching the default mailbox store from IMAP to POP3 account. After the system restarts, users can move to the Account Settings option again and remove the IMAP account successfully.

Like Us on Facebook:  

Follow Us on Linkedin:  

If you are looking for a based company for your website design work, then you must contact us for a better web design deal. Choosing your based company really matters for your company web design work.

How to setup domain based emails in apple mail: POP3

By blog

In this blog we will provide you with detailed instruction on how to configure your Email account to work on your Mac Mail application.

Step-1. Click on the Apple Icon Menu on the top left of your screen and select the System Preferendces… submenu.

How to setup domain based emails in apple mail POP3 step 1

Step-2. You will be taken to your System Preferences screen where you can adjust various options of your Mac OS. Select the Internet Accounts link to proceed.

How to setup domain based emails in apple mail POP3 step 2

Step-3. You will see a list of all the different accounts you have registered including iCloud, FaceBook, Vimeo, etc. Scroll down and select the Add Other Account… option.

How to setup domain based emails in apple mail POP3 step 3

Step-4. Then select to add a Mail account on the next screen

How to setup domain based emails in apple mail POP3 step 4

Step-5. Here you will see a popup asking you to fill in your name and the Email address that you want to register with Mac Mail. Note, that people you send emails too will receive them from the name you enter here. This option, however, can be changed later on. Finally, click Sign in to proceed.

How to setup domain based emails in apple mail POP3 step 5

Step-6. Here, you have to fill in the server settings for your Email account:

Email Address: – should be pre-filled with the value you’ve entered in the previous screen
Username: – enter your full email address as username. It will be used both for the incoming and outgoing connection
Password: – enter the password for your email account
Account Type: – it’s set to IMAP by default. Unless you specifically want to use POP3, please leave it that way
Incoming Mail Server: – add mail.yourdomain.com unless you have a specific MX records configuration for your domain name
Incoming Mail Server: – same as the incoming server

Once you fill in all the details, press Sign In to proceed.

How to setup domain based emails in apple mail POP3 step 6

Step-7. At last you will be asked which programs you want to use this account with. The available options depend on the applications you have installed on your account.

How to setup domain based emails in apple mail POP3 step 7

Now use your email account with the Mac Mail application!

Like Us on Facebook:  

Follow Us on Linkedin:  

If you are looking for a based company for your website design work, then you must contact us for a better web design deal. Choosing your based company really matters for your company web design work.

How to create email accounts using cPanel

By blog

In this blog we will show you for one of your domain names.

Step-1. Login to cPanel and click on the Email Accounts icon located in the MAIL section.

How to create email accounts using cPanel step 1

Step-2. Type in the new Email account you want to create and fill the necessary information for it.

How to create email accounts using cPanel step 2

> Email – Enter the email address to create email accounts using cPanel. Note, that you can choose only from domains, associated with your account – your primary domain and all addon and parked domains.

> Password – Select a strong password for your new email account. The password strength meter will help you make it secure enough.

> Mailbox Quota – Choose the size of the mailbox. Note, that different accounts have different maximum mailbox size. You will see a note with your specific limitation above this field.

Once you’re done, press the Create Account button at the bottom. That’s it, in few seconds, your new will be created.

Like Us on Facebook:  

Follow Us on Linkedin:  

If you are looking for a based company for your website design work, then you must contact us for a better web design deal. Choosing your based company really matters for your company web design work.

How to Add Business to Google Maps?

By blog

Adding or Claiming Your Business on Google My Business

If you’re an established business, chances are your business already exists in the Google My Business directory and you’ll just need to claim it. New businesses or new locations will probably have to be added.

Step-1. Go to Google My Business.

Select “Get on Google”

How to Add Business to Google Maps

Step-2. Enter Your Business Name and Address in the Search Box.

How to Add Business to Google Maps step 2

Step-3. Select or Add Your Business.

Click on your business listing if it appears among the suggested matches. If not select “Add your Business”, and provide the necessary information.

TIP: Determine how you want your business Name-Address-Phone Number (NAP) to appear across the web and use that NAP here (i.e. Will you spell out S-t-r-e-e-t, or use St.?) The address that you use here should become your default address across the web. Consistency is important.

As you answer questions, remember that the more specific and accurate the information Google has about your business, the better it will be able to correctly classify and display your business listing.

Category Selection

Near the bottom of the form, you will be asked to choose a Category that describes your business.
The category selection is very important as it is essentially the way Google will classify your business, and the type of search query it will display your listing for.
Google has preset Categories, or keywords, for each industry. Start typing your keyword in to see if Google produces a match, then select the best one. You will get a chance to add more categories later on (up to 5).

How to Add Business to Google Maps step 3

Step-4. Verify Your Business

Google will want to verify that your business is located where you say that it is. This usually means waiting 1-2 weeks for a postcard with a verification PIN.

How to Add Business to Google Maps step 4

Occasionally you’ll be given the option to receive your PIN by text message or or automated phone call – take it – it’s much faster and easier!

TIP: If you do have to wait on a postcard, remind anyone that handles the mail to be on the lookout for Google Verification Postcardit, then try to verify it as soon as you get it (you have 30 days). You’d be surprised how often businesses have to go through the verification process 2 or 3 times because someone threw the postcard away or forgot to use it once they received it.

Step-5. Confirm your Business. Set up a Google+ Page.

How to Add Business to Google Maps step 5

Setting up your Google My Business page is the first step in Local Search Optimization, and should be a high priority for all businesses hoping to be found online.

Like Us on Facebook:  

Follow Us on Linkedin:  

If you are looking for a based company for your website design work, then you must contact us for a better web design deal. Choosing your based company really matters for your company web design work.

WordPress Security Tips

By blog

What is Security?

Fundamentally, security is not about perfectly secure systems. Such a thing might well be impractical, or impossible to find and/or maintain. What security is though is risk reduction, not risk elimination. It’s about employing all the appropriate controls available to you, within reason, that allow you to improve your overall posture reducing the odds of making yourself a target, subsequently getting hacked.

Table of contents

1. Should not use admin as a username
2. Use a less common password
3. Add Two-Factor Authentication
4. Employ Least Privileged principles
5. Hide wp-config.php and .htaccess
6. Use WordPress security keys for authentication
7. Disable file editing
8. Limit login attempts
9. Be selective with XML-RPC
10. Hosting & WordPress security
11. Stay up-to-date always
12. (Free) plugins & themes
13. Understand File and Folder Permissions
14. Backup, Backup, Backup

WordPress itself has a list on you might want to read. Of course, some of the things in that list will be repeated in the article below. We prefer a more hands on list and direction, that’s why we decided to write this article.

Should not use admin as a username

This is perhaps the easiest baseline step for you can take as a WordPress user. It costs you nothing, and the install makes it really easy to do. A majority of today’s attacks target your wp-admin / wp-login access points using a combination of admin and some password in what is known as Brute Force attacks. Common sense would dictate that if you remove admin you’ll also kill the attack outright.

The argument exists that the attacker can still enumerate the user ID and Name and can in some instances pull the new username. There is no denying this. Remember though, Security is not about risk elimination, it’s about risk reduction.

For the everyday, automated Brute Force attack, removing the default admin or administrator username will already help a lot. You’re at least making it a bit harder for the hacker to guess the username. For the sake of clarity, understand that when we say “admin” we are speaking specifically to the username only and not the role.

Simply create a new user in WordPress at Users > New User and make that a user with Administrator rights. After that, delete the admin user. Don’t worry about the post or pages the admin user has already created. WordPress will nicely ask you: “What should be done with content owned by this user?” and give you the option to delete all content or assign it to a new user, like the one you have just created.

Use a less common password

An easy thing to remember is CLU: Complex. Long. Unique.

This is where tools like 1Password and LastPass come into play, as they each have password generators. You type in the length, and it generates the password. You save the link, save the password, and move on with your day. Depending on how secure I want the password to be, I usually set length of the password (20 characters is always right) and decide on things like the inclusion of less usual characters like # or *.

‘123456’ isn’t a password. ‘qwerty’ is like writing your security code on your bank card. ‘letmein’; seriously? Shame on you. Even ‘starwars’ made the 2015 list of 25 most used passwords. Remember, you’re never as unique as you think you are…

Add Two-Factor Authentication

Even if you’re not using ‘admin’ and are using a strong, randomly generated password, Brute Force attacks can still be a problem. To address this, things like Two-Factor Authentication are key to helping to reduce the risk of such attacks.

The essence of two-factor authentication for is exactly as implied in the name, two forms of authentication. It’s the recognized standard today for enhanced security at your access points. You are already using two-factor authentication for Gmail, Paypal, and the works (at least you should be), why not add it to your toolkit as well

. Ipstenu (Mika Epstein) did an article on the subject you might want to read: Two Factor Authentication.

There is a plugin for that: Google Authenticator. An alternative that takes a slightly different approach for the same purpose is the Rublon Plugin.

Employ Least Privileged principles

The WordPress.org team put together a great article in the WordPress Codex regarding Roles and Capabilities. We encourage you to read it and become familiar with it because it applies to this step.

Concept of Least Privileged is simple, give permissions to:

> those that need it,
> when they need it and
> only for the time they need it.

If someone requires administrator access momentarily for a configuration change, grant it, but then remove it upon completion of the task. The good news is you don’t have to do much here, other than employ best practices.

Contrary to popular belief, not every user accessing your WordPress instance needs to be categorized under the administrator role. Assign people to the appropriate roles and you’ll greatly reduce your security risk.

Hide wp-config.php and .htaccess

It’s actually really simple, especially when you are using Yoast SEO for WordPress > Tools > File Editor to edit your .htaccess.

For better , you’d need to add this to your .htacces file to protect wp-config.php:

<Files wp-config.php>
order allow,deny
deny from all
</Files>

That will prevent the file from being accessed. Similar code can be used for your .htacces file itself, by the way:

<Files .htaccess>
order allow,deny
deny from all
</Files>

You can do it easily.

Keys and Salts work in conjunction with each other to protect your cookies and passwords in transit between the browser and web server. These authentication keys are basically set of random variables, used to improve security (encryption) of information in cookies. Changing this in wp-config.php can be simply done by getting a new set of keys here and add these. These keys change on a refresh of that page, so you’ll always get a fresh set.

Disable file editing

If a hacker gets in, the easiest way that he could change your files would be to go to Appearance > Editor in WordPress. To lift your , you could disable writing of these files via that editor. To do this Again, open wp-config.php and add this line of code:

define(‘DISALLOW_FILE_EDIT’, true);

But still you will be able to edit your templates via your favorite FTP application, you just won’t be able to do it via WordPress itself.

Limit login attempts

The attacks like a Brute Force attack, target your login form. Specifically for , the All in One WP Security & Firewall plugin has an option to simply change the default URL (/wp-admin/) for that login form.

You could also limit the number of attempts to login from a certain IP address. There are several WordPress plugins to help you to protect your login form from IP addresses that fire a multitude of login attempts your way.

Be selective with XML-RPC

XML-RPC is an application program interface (API) that’s been around for a while. It’s used by a number of plugins and themes, so we caution the less technical to be mindful how they implement this specific hardening tip.

While functional, disabling can come with a cost. Which is why we don’t recommend disabling for everything, but being more selective on how and what you allow to access it. In WordPress, if you use Jetpack you’ll want to be extra careful here.

There are lots of plugins that help you be very selective in the way you implement and disable XML-RPC by default.

Hosting companies simply see your website differently. There is no simple rule to decide on your WordPress hosting company. But the choice of a hosting company does matter when optimizing your .

All most Every article written on hosting or hosting companies seems to start by telling you that the cheapest one is probably not the best one. Most cheaper hosting plans won’t have support to help you out with a hacked site. These plans include little to secure your website, like for instance set up a Website Firewall. Shared hosting, for instance, does imply that your hosting server is also populated with other websites. These might have security issues of their own, which in turn might affect your own website’s security as well.

Be mindful of host account

One of the biggest challenges with hosts is in their account configuration for website owners. Website owners are allowed to install and configure as many websites as they want, and this fosters “soup kitchen”-like environments.
This is challenging because, in many instances, a website is compromised via a concept known as cross-site contamination in which a neighboring site is used as the attack vector. The attacker penetrates the server, then moves laterally into neighboring sites on the server.

Best way to account for this is to create two accounts, one which you treat as a production environment – only live sites are published – and a staging one, in which you put everything else.

Stay up-to-date always

Staying up-to-date is an easy statement to make, but for website owners in the day-to-day, we realize how hard this can be. Our websites are complex beings, we have 150 different things going at any given time, and sometimes it’s difficult to apply the changes quickly.

Updates need to extend beyond WordPress core. The same study shows that a very large percentage of the website hacks came from out-of-date, vulnerable, versions of plugins.

This can be compounded in really complex environments in which dependencies make it so that backups can’t be achieved. This is why we personally employ Sucuri’s Firewall. This firewall virtually patches and hardens our website at the edge. It gives us the time we require to go back and apply updates in a more reasonable time frame, allowing us to test in our staging environments first, and only then push to production.

(Free) plugins & themes

WordPress have a tendency to apply themes and plugins at will to their posts. Unless you’re doing this on a test server for the sole purpose of testing that theme or plugin, that makes no sense, especially not with reference to . Most plugins and a lot of themes are free, and unless you have a solid business model to accompany these free giveaways. If a developer is maintaining a plugin just because it’s good fun, chances are he or she did not take the time to do proper security checks.

How to pick the right plugin

Let us focus on the basics of plugin selection here. As explained above, free plugins and themes could be a possible vulnerability. When adding a plugin (or theme for that matter), always check the rating of that plugin. WordPress.org shows ratings, but one five star rating won’t tell you anything, so also check the number or ratings. Depending on the niche, a plugin should be able to get multiple reviews. If more people think a plugin is awesome and take the time to rate it, you could decide to use it too.

raiting1

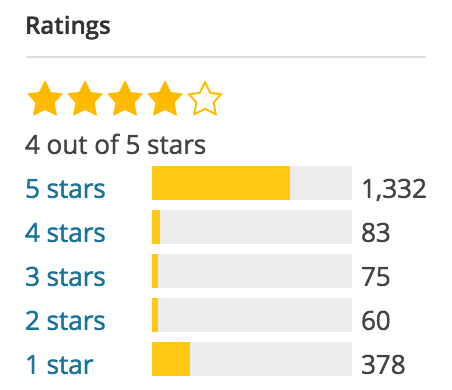
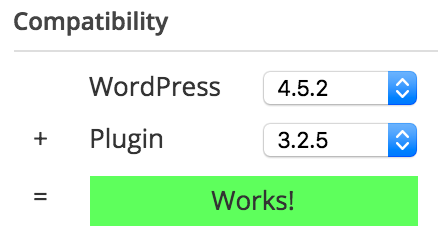
Another thing you want to check is, If a plugin hasn’t been updated for two years, WordPress will tell you that. That doesn’t mean it’s a bad plugin, it could also mean there hasn’t been a need to update it, simply because the plugin still works. The ratings will tell you that, and the compatibility with the current WordPress version, which is also listed on the plugin page at wordpress.org.

compact2

Based on these ratings and compatibility, you could pick your plugins less random and have a larger chance of some kind of security being added.

Understand File and Folder Permissions

In the vast majority of cases, you shouldn’t need to mess around too much with WordPress defaults but it’s worth your while having at least a cursory understanding of file permission modes in general.

The two most common modes you will come across are 644 and 755. These are basically categories that determine the set of rules that govern each file or directory (i.e. who can read, open or modify files).

Files and directories categorized under the 644 mode can be read and written to (this is UNIX-speak for modified in any way) by their owner (the user on the server who created them) but only read by everyone else. This is the ideal setting for many types of files.

The 755 mode meanwhile is mostly used for folders since it allows all users to change into that directory. You’ll occasionally come across plugins that require certain folders to be set to 755.

File and folder permissions can be a head-melting topic if you are new to it but, if you remember nothing else, bear in mind that you should always avoid setting a permission mode to 777 – – even if a plugin explicitly asks you to – unless you know exactly what you’re doing.

This mode is basically a big no-no since it grants complete access to absolutely any user, allowing them to read, write to or delete directories at will and potentially cause all sorts of problems.

Backup, Backup, Backup

“Even through I walk though the valley of the shadow of death, I will fear no evil, for I have dutifully performed backups.”

Backups are such a simple yet crucial part of site security they should be preached as gospel.

In the unfortunate event of a security breach – catastrophic or otherwise – you’ll be enormously thankful you had adequate backups. Fail to get them in place in advance and the road back could be long and painful.

The only potential downside here is if you’re only performing backups semi-regularly where you risk potential data loss if backups are out of date. A weekly or bi-weekly backup should be more than enough for most websites and these can be automated through plugins so you don’t actually have to remember to perform them manually.

If you’re worried about maintaining a huge library of unnecessary backups, well, that could happen. But then again it’s 2015 – online and offline storage space are both ridiculously cheap and the cost involved is well worth the peace of mind it brings. Plus, you can always rotate the oldest snapshots out of storage once a set amount of time has passed to save on space.

Like Us on Facebook:  

Follow Us on Linkedin:  

If you are looking for a based company for your website design work, then you must contact us for a better web design deal. Choosing your based company really matters for your company web design work.

How to export contacts from outlook to gmail

By blog

Step-1.

If you need to account, it is similar to the preceding process. In Outlook, click on “File -> Import/Export.”

How to export contacts from outlook to gmail step 1

Step-2.

When the import/export wizard opens, select “export to a file” and then click “Next.”

How to export contacts from outlook to gmail step 2

Step-3.

On the proceeding screen, we want to select “Comma Separated Values” and click “Next.” This is going to give us a .CSV file just like when we exported our contacts in the last section.

How to export contacts from outlook to gmail step 3

Step-4.

Choose your contacts on the next screen. You might have to scroll through to find them, but they should be under your main e-mail account.

How to export contacts from outlook to gmail step 4

Step-5.

This last screen shows you what’s about to happen (“Export ‘Contacts’ from folder: Contacts”) and offers you the opportunity to map any custom fields you might have created in Outlook

How to export contacts from outlook to gmail step 5

Step-6.

What does this mean? Simply, some of the fields in your Outlook address book might not match the destination you’re importing to, which means you’ll need to “map” them. As the dialog explains, you need to drag the Outlook value right, to the field that most closely resembles it

How to export contacts from outlook to gmail step 6

Step-7.

Chances are you probably won’t need to mess with this, but it’s good to know in case you import your Outlook contacts and end up with mismatched fields. Regardless, when you’re ready to make the conversion, click “Finish” on the previous screen.

Now that you’ve got your .CSV file with all your contacts in it, it’s time to import into Gmail. Again, if you want open this up in Excel and do some quick editing, this is your chance.

How to export contacts from outlook to gmail step 7

Step-8.

When you’re ready, in Gmail, click on the “Mail” dropdown menu and select “Contacts.”

How to export contacts from outlook to gmail step 8

Step-9.

On the contacts screen, click the “More” button and select “Import…” from the selections.

How to export contacts from outlook to gmail step 9

Step-10.

Click “Choose File” on the import contact screen.

How to export contacts from outlook to gmail step 10

Step-11.

The open dialog appears; you know the drill, choose your .CSV file in its save location and click “Open.” When you’re back at the import contacts screen, click “Import.”

How to export contacts from outlook to gmail step 11

Your newly imported contacts won’t be merged into your main contacts – at least not in Gmail – instead they’ll get their own group.

How to export contacts from outlook to gmail step 12

Like Us on Facebook:  

Follow Us on Linkedin:  

If you are looking for a based company for your website design work, then you must contact us for a better web design deal. Choosing your based company really matters for your company web design work.